Developer Guide
- 1. Introduction
- 2. Design
- 3. Implementation
- 4. Documentation
- 5. Testing
- 6. Logging
- 7. Configuration
- 8. Dev-ops
- Appendix A: Product scope
- Appendix B: User stories
- Appendix C: Use Cases
- Appendix D: Non-Functional Requirements
- Appendix E: Glossary
- Appendix F: Instructions for manual testing
- Appendix G: Effort
1. Introduction
1.1 Purpose
This document details the architecture and software design of the software application CliniCal, which is implemented as part of our CS2103T project. This document is updated when the design and implementation of the software is modified after every milestone. Each milestone will include a version of this document, and the current milestone of this project is v1.4.
1.2 Audience
The Developer Guide is for those who are interested in understanding the architecture and software design of CliniCal. Specifically, this guide has been written with the current and future CliniCal developers in mind, as this document details the knowledge necessary to modify the codebase to customize for specific operating needs or extend existing functionalities.
1.3 Setting up
The code of CliniCal is open sourced and published for free on a git repository hosted on GitHub. Developers who wish to download the code and/or set up an environment to contribute code should refer to the guide Setting up and getting started.
2. Design
2.1 Architecture

Figure 1. Architecture Diagram
The Architecture Diagram given above explains the high-level design of the App. Given below is a quick overview of each component.
.puml files used to create diagrams in this document can be found in the diagrams folder. Refer to the PlantUML Tutorial at se-edu/guides to learn how to create and edit diagrams.
Main has two classes called Main and MainApp. It is responsible for,
- At App launch: Initializes the components in the correct sequence, and connects them up with each other.
- At shut down: Shuts down the components and invokes cleanup methods where necessary.
Commons represents a collection of classes used by multiple other components.
The rest of the App consists of four components:
-
UI: The UI of the App. -
Logic: The command executor. -
Model: Holds the data of the App in memory. -
Storage: Reads data from, and writes data to, the hard disk.
Each of the four components,
- defines its API in an
interfacewith the same name as the Component. - exposes its functionality using a concrete
{Component Name}Managerclass (which implements the corresponding APIinterfacementioned in the previous point.
For example, the Logic component (see the class diagram given below) defines its API in the Logic.java interface and exposes its functionality using the LogicManager.java class which implements the Logic interface.

Figure 2. Class Diagram of Logic Component
How the architecture components interact with each other
The Sequence Diagram below shows how the components interact with each other for the scenario where the user issues the command delete 1.

Figure 3. Execution diagram for "delete 1" command
The sections below give more details of each component.
2.2 UI component

Figure 4. Structure of the UI Component
API :
Ui.java
The UI consists of a MainWindow that is made up of parts e.g.CommandBox, ResultDisplay, CalendarDisplay, PatientListPanel, StatusBarFooter etc. All these, including the MainWindow, inherit from the abstract UiPart class.
The UI component uses JavaFx UI framework. The layout of these UI parts are defined in matching .fxml files that are in the src/main/resources/view folder. For example, the layout of the MainWindow is specified in MainWindow.fxml
The UI component,
- Executes user commands using the
Logiccomponent. - Listens for changes to
Modeldata so that the UI can be updated with the modified data.
2.3 Logic component

Figure 5. Structure of the Logic Component
API :
Logic.java
Logic uses the CliniCalParser class to parse the user command.
This results in a Command object which is executed by the LogicManager.
The command execution can affect the Model (e.g. adding a patient).
The result of the command execution is encapsulated as a CommandResult object which is passed back to the Ui.
In addition, the CommandResult object can also instruct the Ui to perform certain actions, such as displaying help to the user.
Given below is the Sequence Diagram for interactions within the Logic component for the execute("delete 1") API call.

Figure 6. Logic Component Interactions for "delete 1" Command
DeleteCommandParser should end at the destroy marker (X) but due to a limitation of PlantUML, the lifeline reaches the end of diagram.
2.4 Model component
 Figure 7. Structure of the Model Component
API : Model.java
The Model,
- stores a
UserPrefobject that represents the user’s preferences. - stores the CliniCal application data.
- exposes unmodifiable
ObservableList<Patient>andObservableList<Appointment>that can be ‘observed’ e.g. the UI can be bound to this list so that the UI automatically updates when the data in the list change. - does not depend on any of the other three components.
Allergy list in the CliniCal application, which Patient references. This allows CliniCal to only require one Allergy object per unique Allergy, instead of each Patient needing their own Allergy object.

Figure 8. Alternative structure for Model component
2.5 Storage component

Figure 9. Structure of the Storage Component
API : Storage.java
The Storage component,
- can save
UserPrefobjects in json format and read it back. - can save the patient and appointment data in json format and read it back.
2.6 Common classes
Classes used by multiple components are in the seedu.addressbook.commons package.
3. Implementation
This section describes some noteworthy details on how certain features are implemented.
3.1 Undo/Redo feature
3.1.1 Implementation
The undo/redo mechanism is facilitated by VersionedCliniCal. It extends CliniCal with an undo/redo history, stored internally as an CliniCalStateList and currentStatePointer. Additionally, it implements the following operations:
-
VersionedCliniCal#commit()— Saves the current CliniCal application state in its history. -
VersionedCliniCal#undo()— Restores the previous CliniCal application state from its history. -
VersionedCliniCal#redo()— Restores a previously undone CliniCal application state from its history.
These operations are exposed in the Model interface as Model#commitCliniCal(), Model#undoCliniCal() and Model#redoCliniCal() respectively.
Given below is an example usage scenario and how the undo/redo mechanism behaves at each step.
Step 1. The user launches the application for the first time. The VersionedCliniCal will be initialized with the initial CliniCal application state, and the currentStatePointer pointing to that single CliniCal application state.

Figure 10. Initial CliniCalStateList
Step 2. The user executes delete 5 command to delete the 5th patient in the patient data list. The delete command calls Model#commitCliniCal(), causing the modified state of the CliniCal application after the delete 5 command executes to be saved in the CliniCalStateList, and the currentStatePointer is shifted to the newly inserted CliniCal application state.

Figure 11. CliniCalStateList after "delete 5" command
Step 3. The user executes add n/David … to add a new patient. The add command also calls Model#commitCliniCal(), causing another modified CliniCal application state to be saved into the CliniCalStateList.

Figure 12. CliniCalStateList after "add n/David" command
Model#commitCliniCal(), so the CliniCal application state will not be saved into the CliniCalStateList.
Step 4. The user now decides that adding the patient was a mistake, and decides to undo that action by executing the undo command. The undo command will call Model#undoCliniCal(), which will shift the currentStatePointer once to the left, pointing it to the previous CliniCal application state, and restores the CliniCal application to that state.

Figure 13. CliniCalStateList after undo command
currentStatePointer is at index 0, pointing to the initial CliniCal state, then there are no previous CliniCal states to restore. The undo command uses Model#canUndoCliniCal() to check if this is the case. If so, it will return an error to the user rather
than attempting to perform the undo.
The following sequence diagram shows how the undo operation works:

Figure 14. Logic and Model Component Interactions for Undo Command
UndoCommand should end at the destroy marker (X) but due to a limitation of PlantUML, the lifeline reaches the end of diagram.
The redo command does the opposite — it calls Model#redoCliniCal(), which shifts the currentStatePointer once to the right, pointing to the previously undone state, and restores the CliniCal application to that state.
currentStatePointer is at index CliniCalStateList.size() - 1, pointing to the latest CliniCal application state, then there are no undone CliniCal states to restore. The redo command uses Model#canRedoCliniCal() to check if this is the case. If so, it will return an error to the user rather than attempting to perform the redo.
Step 5. The user then decides to execute the command list. Commands that do not modify the CliniCal application, such as list, will usually not call Model#commitCliniCal(), Model#undoCliniCal() or Model#redoCliniCal(). Thus, the CliniCalStateList remains unchanged.

Figure 15. CliniCalStateList after list command
Step 6. The user executes clear, which calls Model#commitCliniCal(). Since the currentStatePointer is not pointing at the end of the CliniCalStateList, all CliniCal application states after the currentStatePointer will be purged. Reason: It no longer makes sense to redo the add n/David … command. This is the behavior that most modern desktop applications follow.

Figure 16. CliniCalStateList after clear command
The following activity diagram summarizes what happens when a user executes a new command:

Figure 17. Activity Diagram for User Execution of Command
3.1.2 Design consideration
3.1.2.1 Aspect: Execution of undo/redo
-
Current Implementation: Saves the entire patient details in CliniCal application.
- Pros:
- It is easier to implement as the entire list of patients would be saved. The list of patients can then be
easily loaded to be used or saved for future use by
Model.
- It is easier to implement as the entire list of patients would be saved. The list of patients can then be
easily loaded to be used or saved for future use by
- Cons:
- This may have performance issues in terms of memory usage.
- Pros:
-
Alternative Implementation: Undo/redo function is handled by each individual command.
- Pros:
- The application will use less memory (e.g. for
delete, just save the patient being deleted).
- The application will use less memory (e.g. for
- Cons:
- The implementation of undo/redo for each specific command must be correct.
- Pros:
3.1.2.2 Aspect: Choice of data structure to store CliniCal application states
-
Current Implementation: List with
currentStatePointerpointing to the current CliniCal state.- Pros:
- It is easier to implement as only a single List is required and all states can be accessed.
- Cons:
- This requires constant updating of the
CliniCalStateListsuch as purging of redundant states.
- This requires constant updating of the
- Pros:
-
Alternative Implementation: Two Stacks - CommandsExecutedStack and RedoStack
- Pros:
- The more intuitive solution as a stack follows the Last In First Out principle. There would be no need for
any
currentStatePointersince the current state would be at the top of the stacks.
- The more intuitive solution as a stack follows the Last In First Out principle. There would be no need for
any
- Cons:
- Harder to implement as two separate stacks would have to be tracked and there would be more dependencies to implement before and after the execution of every command.
- Pros:
3.2 Add Profile Picture feature
3.2.1 Implementation
This feature allows users to add image files to serve as the patient’s profile picture. The mechanism utilises the StorageManager#addPicture
method to update the patients’ profile pictures.
This feature comprises the AddProfilePictureCommand class. Given below is an example usage scenario and how the mechanism behaves at each step.

Figure 18. Logic Component Interactions for AddProfilePicture Command
Step 1. User inputs “addpicture 1 f/data/images.png” command to add profile picture to the 1st patient.
Step 2. User input is parsed to obtain the patient index and file path of the desired profile picture.
Step 3. After successful parsing of user input, the AddProfilePictureCommand#execute(Model model) method is called.
Step 4. The StorageManager#addPicture method is then called which adds the desired profile picture to the specified patient.
Step 5. Next, the patient’s profile picture is updated in the Model by calling the Model#setPatient method.
Step 6. As a result of the successful update of the patient’s profile picture, a CommandResult object is instantiated and returned to LogicManager.
3.2.2 Design consideration
3.2.2.1 Aspect: Choice of component to save the profile pictures
-
Current Implementation: Save image file through
StorageManager.- Pros:
- Mechanism can be extended from the existing architecture that the project is built upon (AB3).
- Cons:
- There is a need to implement additional exception handling mechanism to inform the user in cases where invalid file path is provided.
- Pros:
-
Alternative Implementation: Save image files through a new standalone class eg.
ImageCommand. This class handles all mechanism related to profile pictures.- Pros:
- Exception handling is simplified as informing the user of invalid file path will be similar to when an invalid command is given.
- Cons:
- It is harder to store and update patient’s profile pictures.
- New dependencies need to be created to associate with the newly created
ImageCommandclass. - Thus, our team decided to implement the first alternative as it follows the existing architecture closely and minimizes the risk of breaking the existing architecture.
- Pros:
3.2.2.2 Aspect: Image filetypes
-
Current Implementation: Only
.jpgand.pngfiletypes are accepted. Using other image filetypes would throw an exception message.- Pros:
- This serves as a form of validation check to ensure that the user only uses supported image filetypes.
- Cons:
- User is limited to
.jpgand.pngfiletypes.
- User is limited to
- Pros:
-
Alternative Implementation: Accept different image filetypes such as
.raw,.tiffor.psd.- Pros:
- User can freely use any types of image file when adding patients’ profile picture.
- Cons:
- Some filetypes may not be well-supported in JavaFX, for example
.psdwhich is a Photoshop document. This may introduce compatibility issues to our application. - Our team assessed that the most common image filetypes are
.jpgand.png. Hence, our team decided to support only.jpgand.pngfiletypes in CliniCal.
- Some filetypes may not be well-supported in JavaFX, for example
- Pros:
3.3 View Command History feature
3.3.1 Implementation
This feature allows users to view history of recently used commands.
All entered user inputs (including those in format format or fails to execute) will be stored into a Stack data structure named commandHistory
due to its Last In First Out (LIFO) property which allows the most recently used command to display first.
The mechanism utilises the CommandHistory#getCommandHistory() to retrieve a list of past used commands from commandHistory.
This feature comprises the HistoryCommand and CommandHistory classes. Given below is an example usage scenario and how the mechanism behaves at each step.
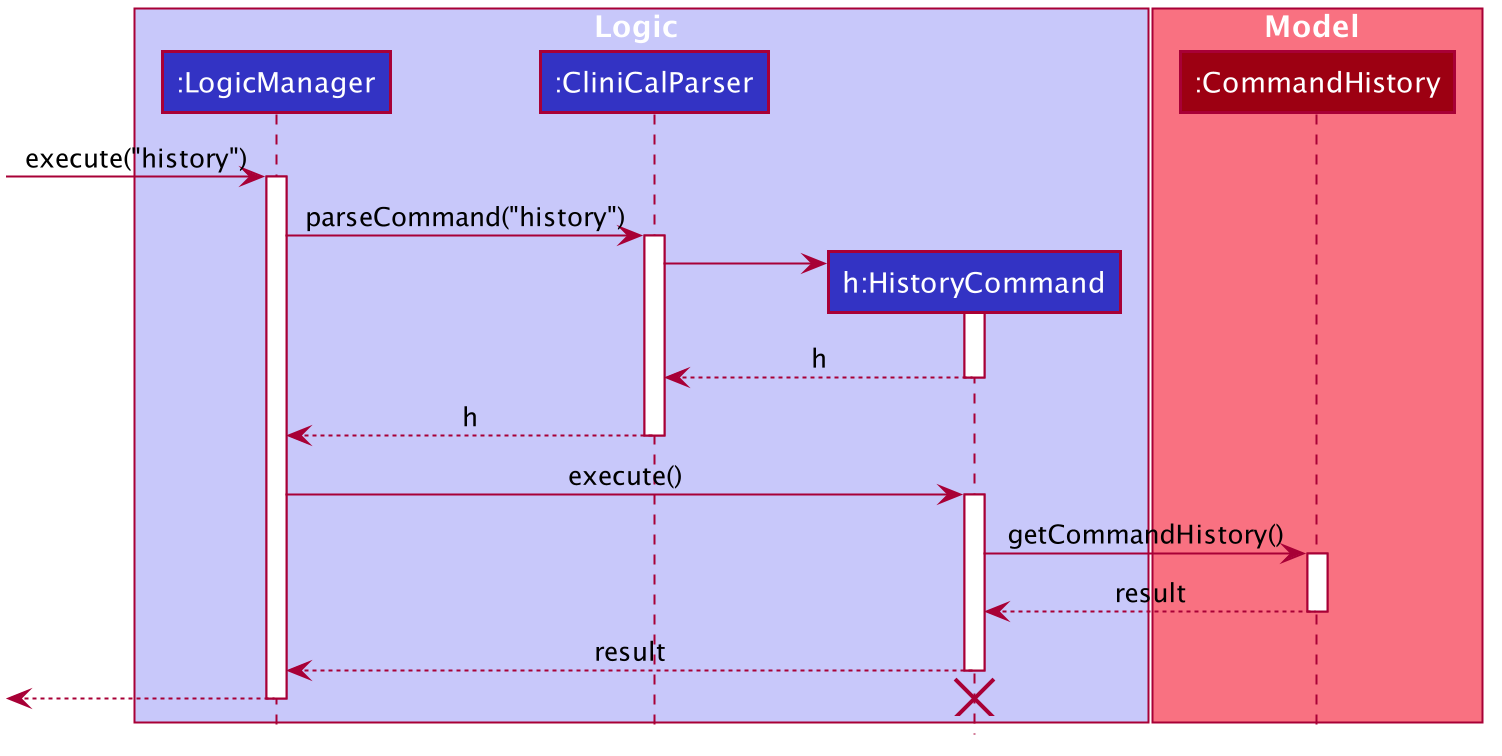
Figure 19. Logic Component Interactions for History Command
Step 1. User inputs “history” to execute the history command.
Step 2. After successful parsing of user input, the HistoryCommand#execute(Model model) method is called.
Step 3. The CommandHistory#getCommandHistory() is then called which will return a list of past used commands arranged in the ascending order of time last used.
Step 4. As a result of successful retrieval of the command history, a CommandResult object is instantiated and returned to LogicManager.
3.3.2 Design Considerations
3.3.2.1 Aspect: Choice of data structure to store commands
-
Current Implementation: Use of stack ADT
- Pros:
- Most recently used command will show up at the top of the list. Also known as Last In First Out (LIFO) method.
- Cons:
- Data stored in stack is not persistent.
- Pros:
3.3.2.2 Aspect: How commands are stored
-
Current Implementation: Store all entered commands
- Pros:
- It is easy to implement.
- The user can check what went wrong with the previous command.
- Cons:
- The application will need more memory to store both valid and invalid commands.
- Pros:
-
Alternative Implementation: Store only commands that are successfully executed
- Pros:
- User do not need to view invalid commands.
- Cons:
- User cannot check what went wrong with the previous command.
- Pros:
3.4 Clear Command History feature
3.4.1 Implementation
This feature allows users to clear history of recently used commands.
The mechanism utilises the CommandHistory#clearHistory to clear all stored commands from commandHistory.
This feature comprises the ClearHistoryCommand and CommandHistory classes. Given below is an example usage scenario and how the mechanism behaves at each step.
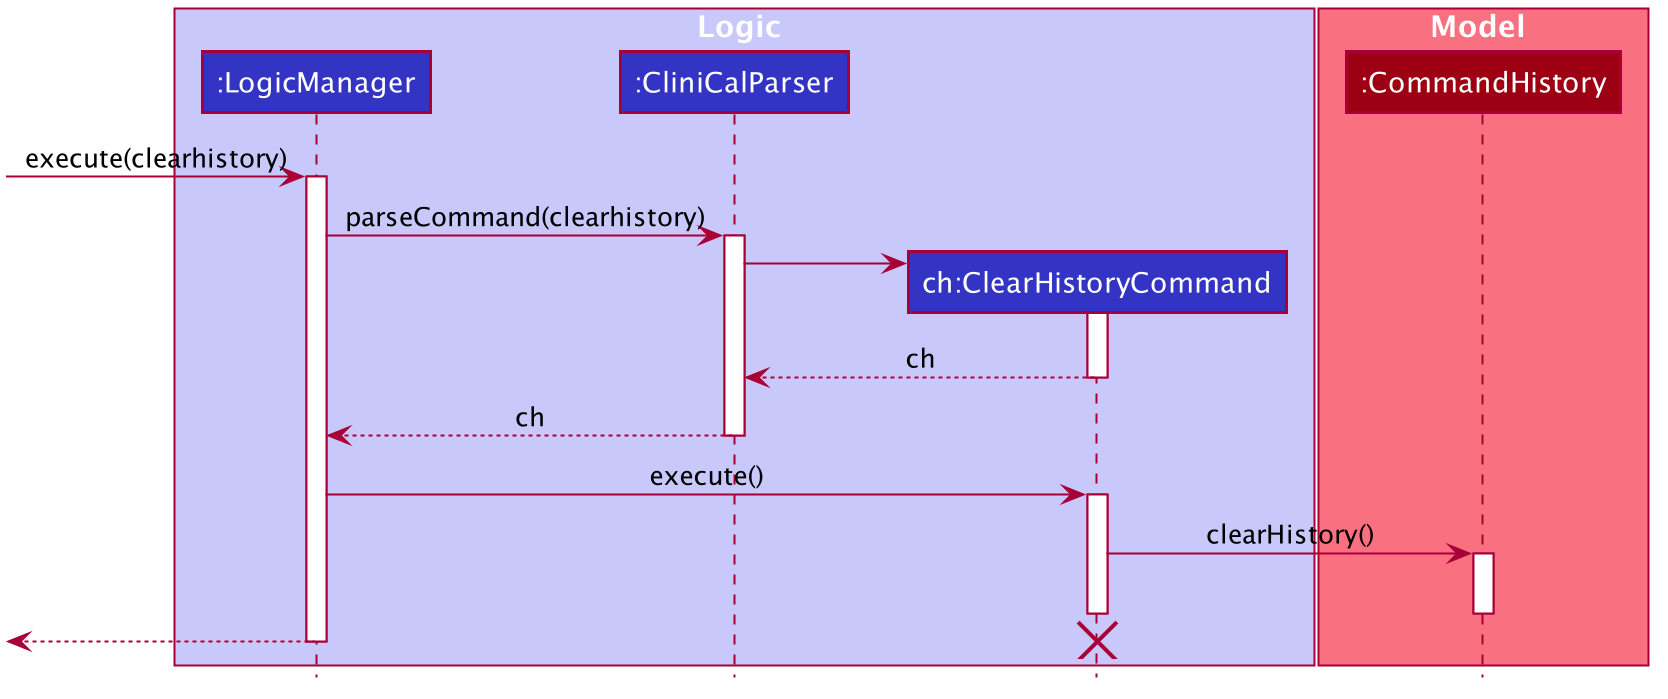
Figure 20. Logic Component Interactions for ClearHistory Command
Step 1. User inputs “clearhistory” to execute the clear history command.
Step 2. After successful parsing of user input, the ClearHistoryCommand#execute(Model model) method is called.
Step 3. The CommandHistory#clearHistory is then called which will clear all commands stored in commandHistory.
3.4.2 Design Considerations
3.4.2.1 Aspect: Choice of Data Structure to clear commands
-
Current Implementation: Use of stack ADT
- Pros:
- Easy to implement clear function.
- Cons:
- Command history is not persistent so recently used commands is only kept during the same usage.
- Pros:
3.5 Retrieve and reuse past commands using arrow keys feature
3.5.1 Implementation
This feature allows users to navigate and reuse past commands using up and down arrow keys.
The mechanism utilises the CommandHistory#peekNext() and CommandHistory#peekPrev(). Given below is an example usage scenario and how the up/down arrow key mechanism behaves at each step.
Step 1. The user launches the application for the first time. The CommandHistory will be initialised with the initial state, and the currentStatePointer pointing to that single state.
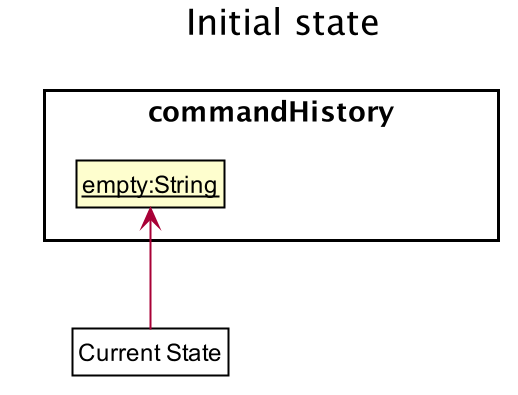
Figure 21. Initial CommandHistory
Step 2. The user executes delete 5 command to delete the 5th patient in the patient data list.
The Logic Manager calls CommandHistory#addUsedCommand() to add a new command to the stack named commandHistory.
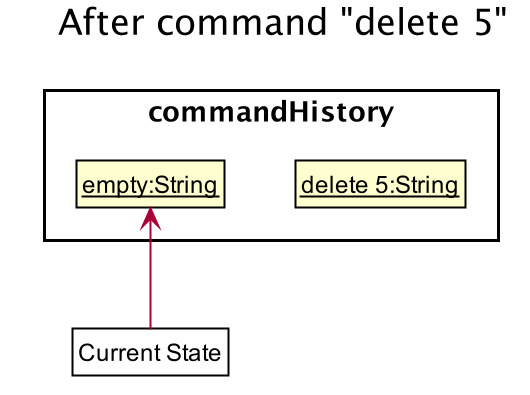
Figure 22. CommandHistory after "delete 5" command
Step 3. The user now decides to reuse delete 5 in the command history and press the up arrow key (↑).
The actionListener of the TextField will detect the up arrow key being pressed and calls CommandHistory#peekNext().
This will shift the currentStatePointer to the right, pointing to the delete 5 command and returns it.
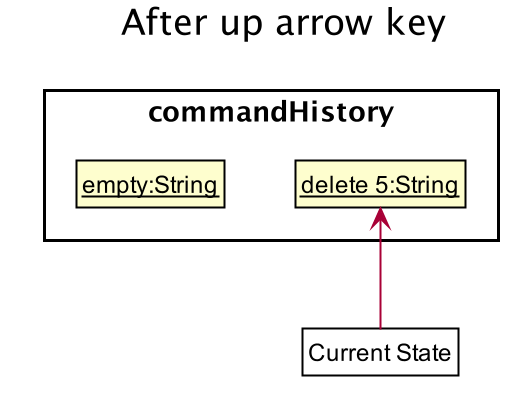
Figure 23. CommandHistory after pressing up arrow
Step 4. The user now decides not to reuse delete 5 and go back to the previous command before delete 5, i.e. empty.
The user will now press the down arrow key (↓) and the actionListener of the TextField will detect the down arrow key being pressed and calls CommandHistory#peekPrev().
This will shift the currentStatePointer to the left, pointing to the initial state that is empty and returns it.
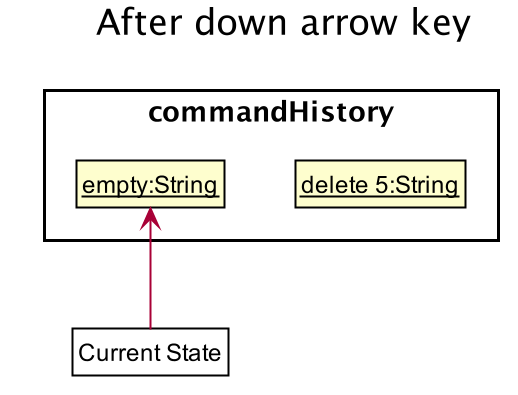
Figure 24. CommandHistory after pressing down arrow
The following sequence diagram shows how the up down arrow key mechanism works:
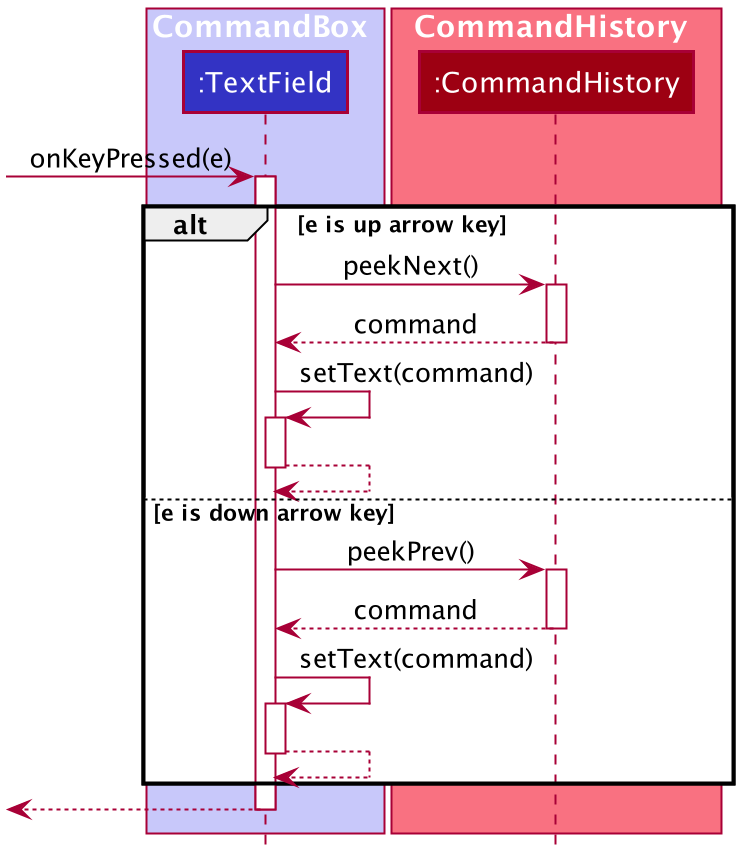
Figure 25. Ui Component Interactions for Peeking Commands
3.5.2 Design Considerations
3.5.2.1 Aspect: How commands are stored
-
Current Implementation: Peek through all entered commands (including those in wrong format or fails to execute)
- Pros:
- Users can edit invalid commands.
- Users can reuse the same command without typing it all out again.
- Cons:
- Only works if the past commands are previously used during the same usage session.
- Pros:
-
Alternative Implementation: Peek through commands that can be successfully executed
- Pros:
- All past commands reused are valid and can be reused safely.
- Users require less time to peek through all commands stored in commandHistory as it does not include invalid commands.
- Cons:
- Users cannot edit invalid commands and will need to spend more time to retype the valid command.
- Pros:
3.6 Display Profile feature
3.6.1 Implementation
This feature allows users to view individual patients’ profile on a separate window. The profile window displays all relevant details that belongs to the patient, including past visitation logs.
The mechanism utilises the following classes and methods to display the patients’ profile:
-
ProfileCommandParser#parse- Parses the input to return aProfileCommandobject -
ProfileCommand#execute- Executes the command to display patient profile -
ProfileWindow#setup- Loads all relevant details of thePatientintoProfileWindow -
MainWindow#handleProfilePanel- Displays patient’s profile
Given below is an example usage scenario and how the mechanism behaves at each step.
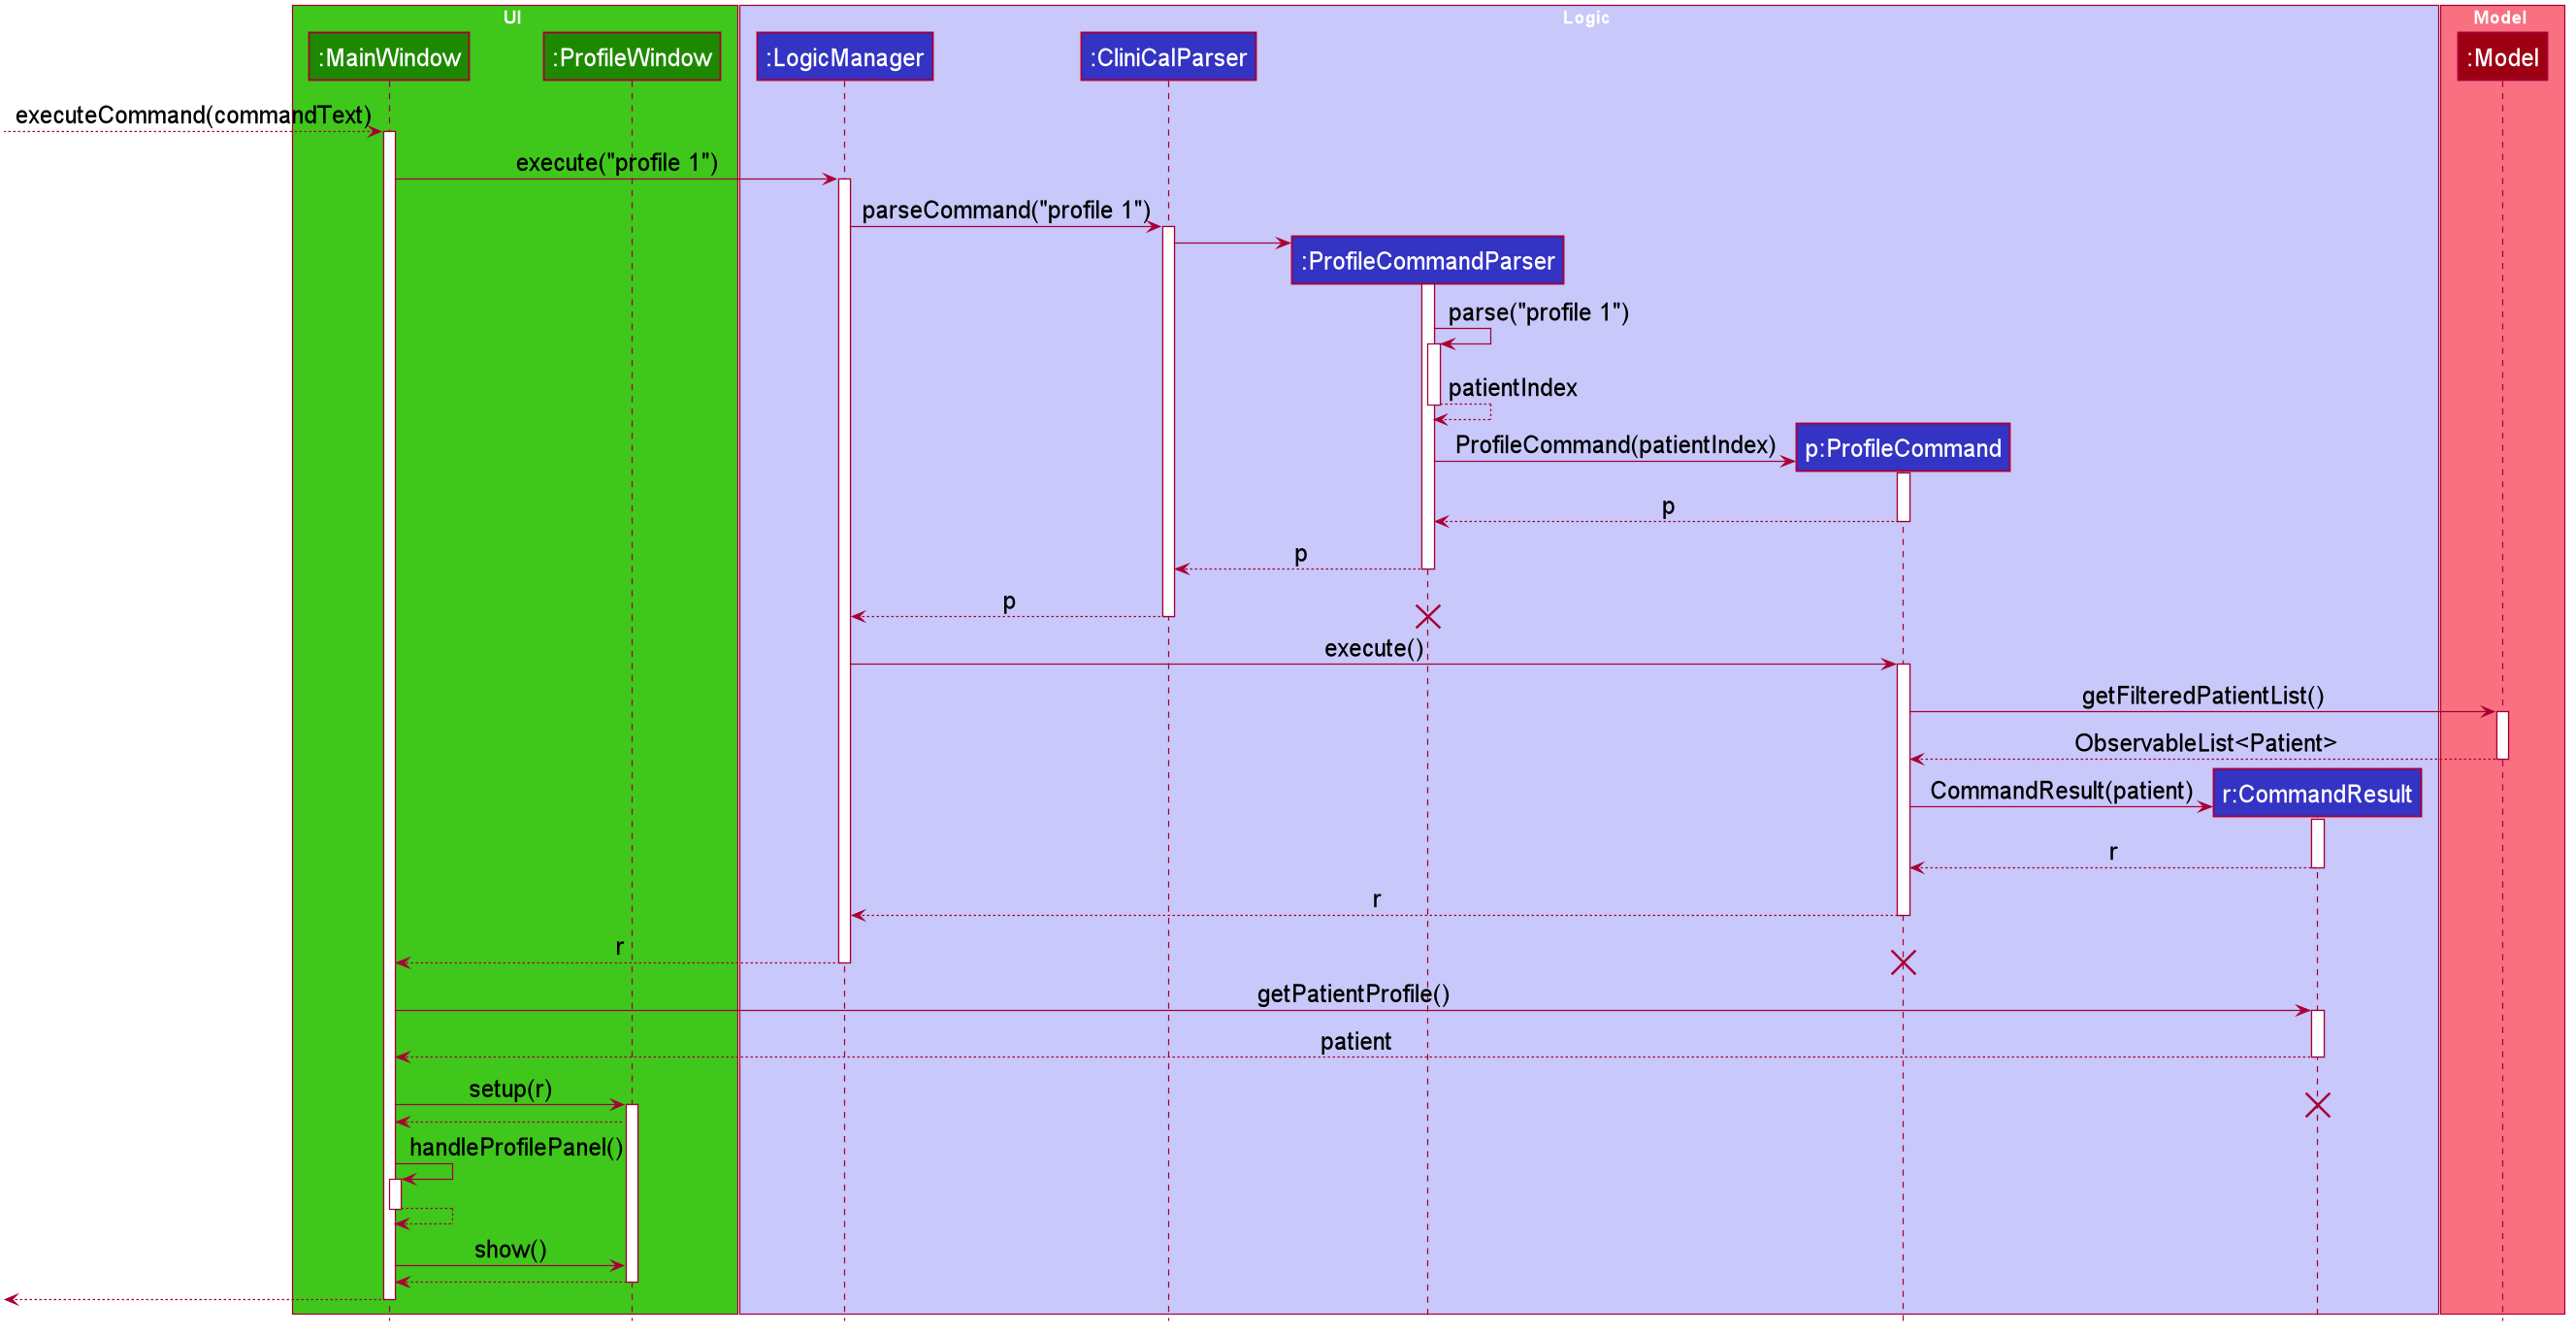
Figure 26. Sequence Diagram for ProfileCommand
Step 1. User inputs “profile 1” command to display the 1st patient’s profile.
Step 2. Input command is parsed to obtain the patient’s index, and a ProfileCommand object is returned.
Step 3. The ProfileCommand#execute(Model model) method is called and this returns a CommandResult object with the 1st Patient instance.
Step 4. Next, MainWindow#executeCommand method is executed which in turn calls ProfileWindow#setup method. This causes ProfileWindow to be
loaded with all relevant details that belongs to the 1st Patient.
Step 5. Finally, MainWindow#handleProfilePanel() method is executed to display the 1st patient’s profile.
The following activity diagram summarizes the main steps taken to display the patient’s profile.
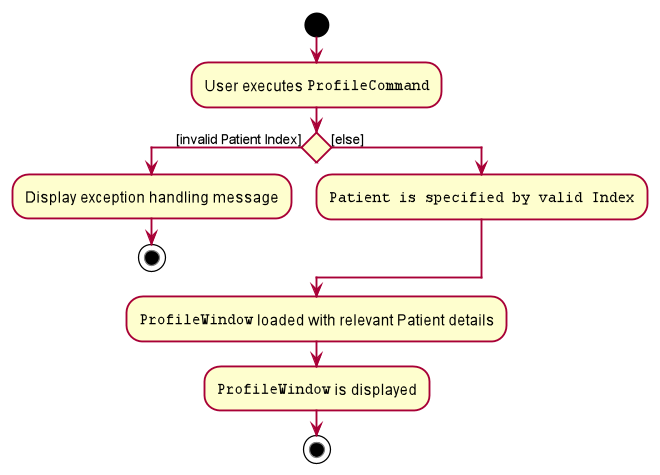
Figure 27. Activity Diagram for steps 1 to 5
3.6.2 Design Considerations
3.6.2.1 Aspect: How patient’s details are retrieved and displayed in ProfileWindow
-
Current Implementation: Patient details are obtained solely from
Patientclass.- Pros:
- Easy to implement as mechanism can be extended from existing AB3 architecture.
- Cons:
- Increases coupling between
Patientclass andProfileWindowclass. This may lead to unforeseen dependency issues.
- Increases coupling between
- Pros:
-
Alternative Implementation: Utilize a separate
Profileclass to copy and store patient’s details everytimeProfileCommandis issued.- Pros:
- Less coupling between
PatientandProfileWindowclass. Instead,Profileclass will act as a facade class as part of Facade pattern architecture.
- Less coupling between
- Cons:
- Requires re-implementation of current codebase which might introduce subtle bugs.
- Need to ensure that functionality of the
Profilefacade class is optimized. Our team assessed that the current implementation is better as it is less prone to introduce new bugs to our existing codebase.
- Pros:
3.7 Appointment feature
3.7.1 Implementation
This feature allows users to schedule and track upcoming appointments with patients. Each Appointment contains the appointment details stored as the attributes of the Appointment object. These attributes include the Name and IcNumber of the relevant patient and AppointmentDateTime of the appointment.
When an appointment is added, edited, or deleted, the corresponding calendar GUI is updated via a listener in the ObservableList.
The mechanism utilises the following classes and methods to display the appointments:
-
XYZAppointmentCommandParser#parse- Parses the input to return aXYZAppointmentCommandobject -
XYZAppointmentCommand#execute- Executes the XYZ command to manipulate the specified appointment -
VEventUtil- Initializes aVCalendarobject containing a mapped list of appointments and then initializes aICalendarAgendaobject containing the initializedVCalendarobject
This feature comprises the AddAppointmentCommand, EditAppointmentCommand, DeleteAppointmentCommand classes. However, much of the logic lies within the CalendarDisplay class as it contains the logic for updating the GUI of the calendar. Given below is an example usage scenario for DeleteAppointmentCommand and how the mechanism behaves at each step.
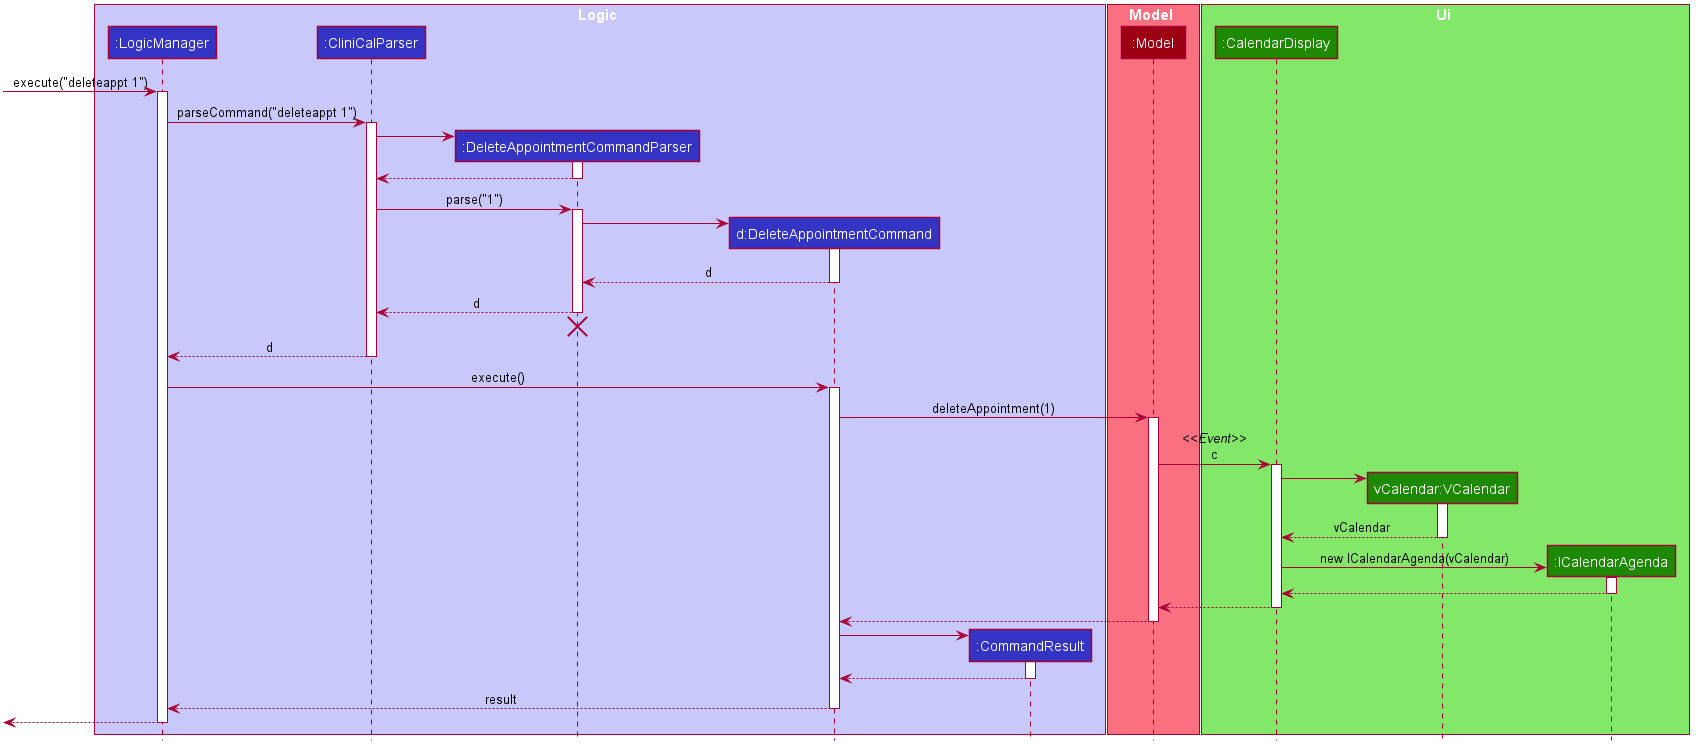
Figure 28. Component Interactions for DeleteAppointment Command
DeleteAppointmentCommandParser should end at the destroy marker (X) but due to a limitation of PlantUML, the lifeline reaches the end of diagram.
Step 1. User inputs deleteappt 1 command to delete the 1st appointment on the list.
Step 2. User input is parsed to obtain the appointment index to delete.
Step 3. After successful parsing of the input, the corresponding DeleteAppointmentCommand object is returned.
Step 4. The DeleteAppointmentCommand#execute(Model model) method is called.
Step 5. The Model#deleteAppointment method is then called which deletes the specified appointment from the ObservableList.
Step 6. The modification of the ObservableList causes an event to be generated and forwarded to CalendarDisplay, as CalendarDisplay had set a listener on the ObservableList.
Step 7. CalendarDisplay creates a new VCalendar with the new list and then creates a new ICalendarAgenda with the new VCalendar, which is then set as the calendar GUI.
Step 8. As a result of the successful deletion of the appointment object, a CommandResult object containing the deleted patient is instantiated and returned to LogicManager.
The following diagram shows a summary of the steps taken when an deleteappt command is run.
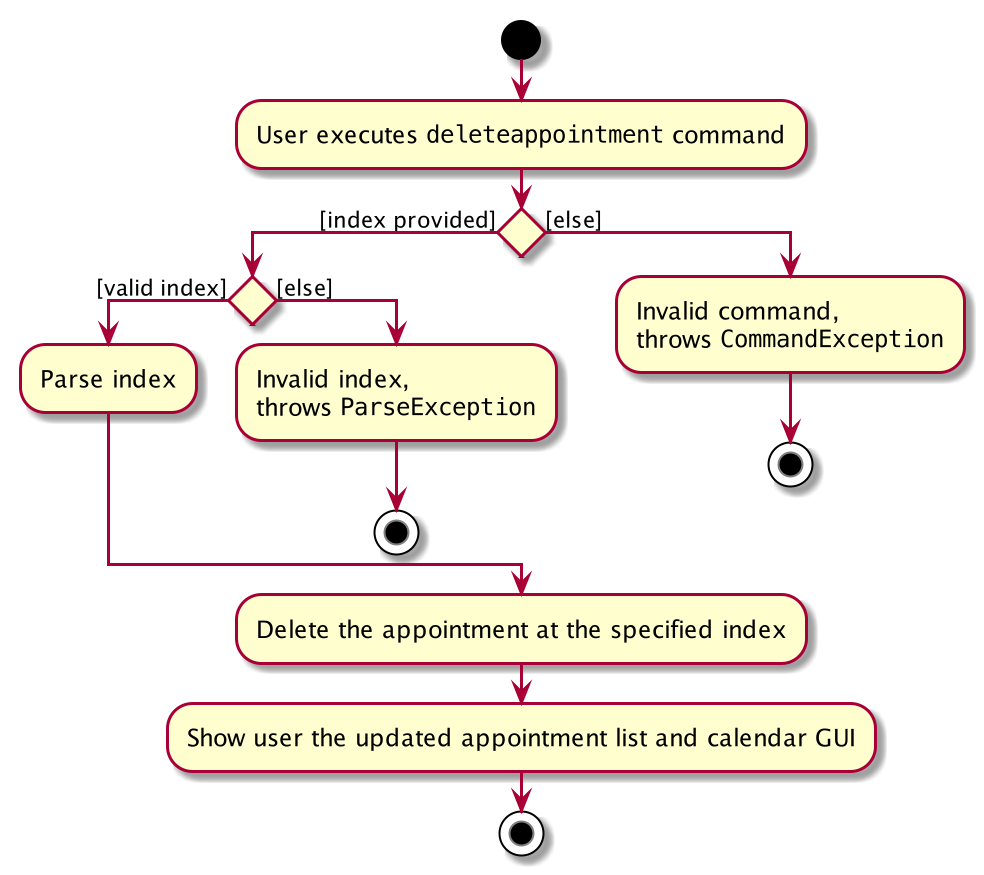
Figure 30. Activity Diagram for User Execution of DeleteAppointment Command
3.7.2 Design considerations
-
Current Implementation: A new
VCalendarobject andICalendarObjectis created when there is a change in the appointment list.- Pros:
- Easy to implement and greatly reduces complexity of code.
- Cons:
- May take a greater number of CPU cycles to carry out as every appointment has to be processed when there is a single change in the appointment list.
- Pros:
-
Alternative Implementation: Modify the
VEventobjects stored inICalendarAgendawhen there is a change in the appointment list.- Pros:
- More efficient use of CPU cycles, possibly better performance on lower end machines
- Cons:
- Requires an extreme increase in complexity of code, as the modification would be different for addition/deletion/edit of appointments.
- Increases coupling between
CalendarDisplay, a UI element, andModel.
- Pros:
3.8 Visitation Log Feature
3.8.1 Implementation
This feature allows users to save the details of each visitation of a patient. Each Patient has a VisitHistory object which contains a list of Visit objects,
each containing the visitation details stored as the attributes of the Visit object. These attributes include the Diagnosis, Prescription and Comments of the visitation.
This feature is achieved through a new Visitation Log pop-up window which allows the user to fill in the relevant details of the visitation.
The mechanism utilises the following classes and methods to display the patients’ profile:
-
AddVisitCommandParser#parse- Parses the input to return aAddVisitCommandobject -
AddVisitCommand#execute- Executes the command to display patient profile -
MainWindow#handleDisplayVisit- Displays the Visitation Log Window -
VisitFormWindow#saveVisit- Processes the visitation details into aSaveVisitCommand -
SaveVisitCommand#execute- Executes the command to save the visitation details
This feature comprises the AddVisitCommand, EditVisitCommand and DeleteVisitCommand classes.
Given below is an example usage scenario for AddVisitCommand and how the mechanism behaves at each step.
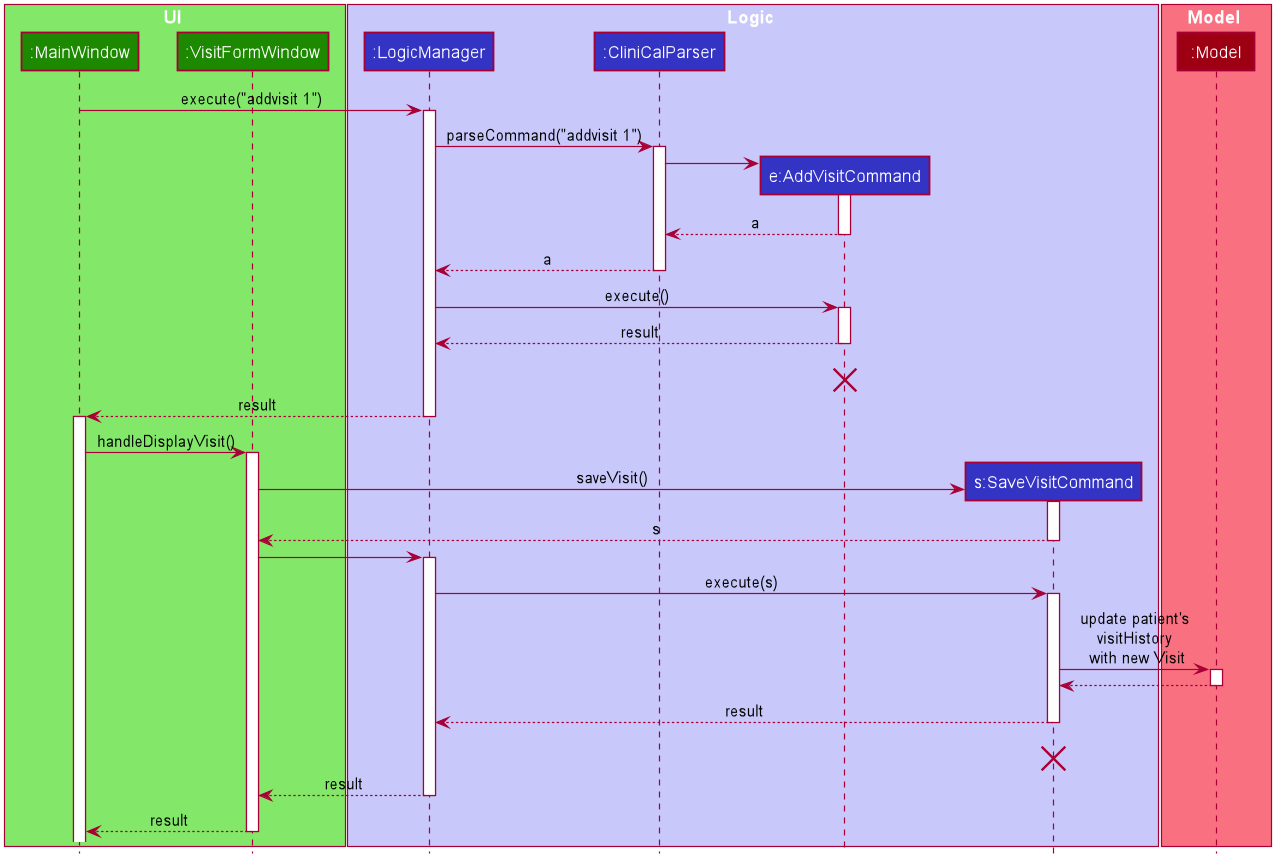
Figure 29. UI and Logic Component Interactions for AddVisit Command
Step 1: User inputs addvisit 1 command to add to the 1st patient’s profile.
Step 2: User input is parsed to return a AddVisitCommand object.
Step 3: The AddVisitCommand#execute method is called and the patient whose visitation to be added to is returned in a CommandResult object.
Step 4: In the MainWindow object, MainWindow#handleDisplayVisit method is called and displays VisitFormWindow to the user.
Step 5: The user inputs the new visitation details, clicks the save buttton and the VisitFormWindow closes.
Step 6: The method VisitFormWindow#saveVisit is called and returns a SaveVisitCommand which is executed in the same VisitFormWindow object.
Step 7 : In SaveVisitCommand, the patient’s VisitHistory is updated with the new Visit created with the visitation details entered in the VisitFormWindow.
The following diagram shows a summary of the steps taken when an addvisit command is run.
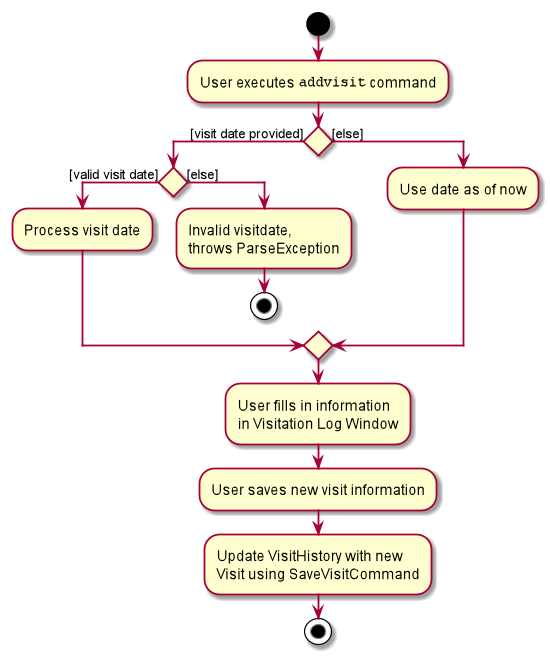
Figure 30. Activity Diagram for User Execution of AddVisit Command
3.8.2 Design Considerations
3.8.2.1 Aspect: Dates to be accepted in addvisit and editvisit commands
-
Current Implementation: Only dates in the past up till and including today.
- Pros:
- More logical as only visitations that have been completed can be recorded in the database.
- Cons:
- Requires refactoring as we have to ensure dates in the sample data and tests are compliant with this new restriction.
- Pros:
-
Alternative Implementation: Accept any dates to be input as the date of visitation including past and present dates.
- Pros:
- Easier to implement as any date can be accepted as the date of visitation.
- Cons:
- May introduce visitations that do not make sense as the visitation has not occurred yet.
- Pros:
4. Documentation
This section highlights the documentation outline used for this software project.
Refer to the guide: Documentation Guide
5. Testing
This section highlights the kind of test cases that are included in CliniCal’s codebase. It also shows how these test cases can be run on IntelliJ.
Refer to the guide: Testing guide
6. Logging
This section highlights the method of logging used in CliniCal’s codebase.
Refer to the guide: Logging guide
7. Configuration
This section highlights how certain properties of CliniCal can be controlled via the configuration file.
Refer to the guide: Configuration guide
8. Dev-ops
This section highlights the tools used to build and release updated versions of CliniCal.
Refer to the guide: DevOps guide
Appendix A: Product scope
Target user profile:
- has a need to manage a significant number of patient records
- prefer to access patient records electronically
- can type fast
- is reasonably comfortable using CLI apps
- prefer to check schedule on desktop application instead of relying on physical calendar
Value proposition: provide a platform for doctors to manage their upcoming appointments and access patient’s medical records more easily
Appendix B: User stories
Priorities: High (must have) - * * *, Medium (nice to have) - * *, Low (unlikely to have) - *
| Priority | As a … | I want to … | So that I can… |
|---|---|---|---|
* * * |
new user | see usage instructions | refer to instructions when I forget how to use the App |
* * * |
user | add a new patient | |
* * * |
user | delete a patient | remove entries that I no longer need |
* * * |
user | find a patient by name | locate details of patients without having to go through the entire list |
* * |
user | hide private contact details | minimize chance of someone else seeing them by accident |
* * * |
doctor | retrieve the medical details/notes for each patient easily | refer to it when the patient visits again |
* * * |
doctor | type/store my patients’ data on their individual profile pages | update their condition after each appointment and not write everything down by hand |
* * |
doctor | have an undo command | undo any mistakes I make in the software |
* * |
doctor | have a redo command | redo any work that I’ve undone |
* |
doctor | retrieve past commands that I input in the application | refer to my past commands |
* |
doctor | add profile picture to each patient’s profile | can recognize the patient using the profile picture |
* |
doctor | color code patients | know which patients are more at risk (e.g. high blood pressure) |
Appendix C: Use Cases
(For all use cases below, the System is the CliniCal and the Actor is the user, unless specified otherwise)
Use case: UC01 - Add a new patient
MSS
- User requests to add a new patient.
-
CliniCal adds a new patient with the provided details.
Use case ends.
Extensions
- 1a. The given command is invalid.
- 1a1. CliniCal shows an error message.
Use case resumes at step 1.
- 1b. The given parameter is invalid.
- 1b1. CliniCal shows an error message.
Use case resumes at step 1.
- 1c. Not all the mandatory parameters are provided.
- 1b1. CliniCal shows an error message.
Use case resumes at step 1.
Use case: UC02 - Edit a patient
MSS
- Precondition: User is able to see the patient list.
- User requests to edit the details of a specified patient in the list.
- CliniCal edits the patient, based on the provided details.
-
CliniCal shows an updated patient list.
Use case ends.
Extensions
- 1a. The patient cannot be found.
- 1a1. CliniCal shows an error message.
Use case resumes at step 1.
- 1b. The given command is invalid.
- 1b1. CliniCal shows an error message.
Use case resumes at step 1.
- 1c. The given parameter is invalid.
- 1c1. CliniCal shows an error message.
Use case resumes at step 1.
Use case: UC03 - Delete a patient
MSS
- Precondition: User is able to see the patient list.
- User requests to delete a specific patient in the list.
- CliniCal deletes the patient.
-
CliniCal shows an updated patient list.
Use case ends.
Extensions
- 1a. The patient cannot be found.
- 1a1. CliniCal shows an error message.
Use case resumes at step 1.
- 1b. The given command is invalid.
- 1b1. CliniCal shows an error message.
Use case resumes at step 1.
- 1c. The given parameter is invalid.
- 1c1. CliniCal shows an error message.
Use case resumes at step 1.
Use case: UC04 - Add a patient’s profile picture using command line interface
MSS
- User keys in command to add profile picture to patient.
- CliniCal adds the profile picture to the specified patient.
-
CliniCal shows an updated list of patients.
Use case ends.
Extensions
- 1a. The given command is invalid.
- 1a1. CliniCal shows an error message.
Use case resumes at step 1.
Use case: UC05 - Add a patient’s profile picture using drag and drop
MSS
- User selects the desired profile picture and drags it onto the specified patient profile in CliniCal.
- User releases mouse button.
- CliniCal adds the profile picture to the specified patient.
-
CliniCal shows an updated list of patients.
Use case ends.
Extensions
- 1a. The file being dragged into CliniCal application is not a valid image file.
- 1a1. Patient profile picture is not updated.
Use case resumes at step 1.
- 1b. The profile picture is not dragged onto a valid space that represents patient profile in CliniCal.
- 1b1. Patient profile picture is not updated.
Use case resumes at step 1.
Use case: UC06 - Undo a command
MSS
- User keys in command to undo the previous command.
-
CliniCal shows the command that has been undone.
Use case ends.
Extensions
- 1a. There are no more previous commands to undo.
Use case ends.
Use case: UC07 - Redo a command
MSS
- User keys in command to redo the previous undone command.
-
CliniCal shows the command that has been redone.
Use case ends.
Extensions
- 1a. There are no more commands to redo.
Use case ends.
Use case: UC08 - View command history
MSS
- User requests to list command history.
-
CliniCal shows a list of recently used commands from the command history.
Use case ends.
Extensions
- 2a. The command history is empty.
Use case ends.
Use case: UC09 - Clear command history
MSS
- User requests to clear command history.
-
CliniCal shows a message that the command history is cleared.
Use case ends.
Use case: UC10 - Display patient’s profile
MSS
- User keys in command to display patient’s profile.
- CliniCal displays the specified patient’s profile.
-
User presses esc or ‘close’ button to exit the window.
Use case ends.
Extensions
- 1a. The given command is invalid.
- 1a1. CliniCal shows an error message.
Use case resumes at step 1.
Use case: UC11 - Edit patient’s visitation logs
MSS
- Precondition: User is able to see the patients list.
- User views the profile of a patient (UC10).
- User keys in command to edit a patient’s visitation log.
- CliniCal shows the existing visitation log details in a new window.
- User amends the visitation log details.
- User saves the details.
-
CliniCal saves the visitation log details.
Use case ends.
Extensions
- 2a. The given command is invalid.
- 2a1. CliniCal shows an error message.
Use case resumes at step 2.
- 3a. There are no amendments to be made.
Use case ends.
Use case: UC12 - Delete patient’s visitation logs
MSS
- Precondition: User is able to see the patients list.
- User views the profile of a patient (UC10).
- User requests to delete the visitation log of a patient.
-
CliniCal deletes the visitation log.
Use case ends.
Extensions
- 2a. The given command is invalid.
- 2a1. CliniCal shows an error message.
Use case resumes at step 2.
Use case: UC13 - Add a new appointment
MSS
- Precondition: User is on the overview tab.
- User requests to add a new appointment.
- CliniCal adds the new appointment.
-
CliniCal shows an updated appointment list and an updated calendar.
Use case ends.
Extensions
- 1a. The given command is invalid.
- 1a1. CliniCal shows an error message.
Use case resumes at step 1.
- 1b. The given parameter is invalid.
- 1b1. CliniCal shows an error message.
Use case resumes at step 1.
- 1c. The new appointment time clashes with another appointment.
- 1c1. CliniCal shows an error message.
Use case resumes at step 1.
Use case: UC14 - Edit an appointment
MSS
- Precondition: User is on the overview tab.
- User requests to edit the details of a specified appointment in the list.
- CliniCal edits the appointment.
-
CliniCal shows an updated appointment list and an updated calendar.
Use case ends.
Extensions
- 1a. The patient cannot be found.
- 1a1. CliniCal shows an error message.
Use case resumes at step 1.
- 1b. The given command is invalid.
- 1b1. CliniCal shows an error message.
Use case resumes at step 1.
- 1c. The given parameter is invalid.
- 1c1. CliniCal shows an error message.
Use case resumes at step 1.
- 1d. The new appointment time clashes with another appointment.
- 1d1. CliniCal shows an error message.
Use case resumes at step 1.
Use case: UC15 - Delete an appointment
MSS
- Precondition: User is on the overview tab.
- User requests to delete a specific appointment in the list.
- CliniCal deletes the appointment.
-
CliniCal shows an updated appointment list and an updated calendar.
Use case ends.
Extensions
- 1a. The appointment cannot be found.
- 1a1. CliniCal shows an error message.
Use case resumes at step 1.
- 1b. The given command is invalid.
- 1b1. CliniCal shows an error message.
Use case resumes at step 1.
- 1c. The given parameter is invalid.
- 1c1. CliniCal shows an error message.
Use case resumes at step 1.
Appendix D: Non-Functional Requirements
- Should work on any mainstream OS as long as it has Java
11installed. - Should be able to hold up to 1000 patients without a noticeable sluggishness in performance for typical usage.
- Should be able to schedule up to 100 patient appointments without a noticeable sluggishness in performance for typical usage.
- A user with above average typing speed for regular English text (i.e. not code, not system admin commands) should be able to accomplish most of the tasks faster using commands than using the mouse.
Appendix E: Glossary
- Appointment: An upcoming arrangement for a meeting with the doctor.
- GUI: Graphic User Interface, a user interface that enables the user to interact with the application through visual elements.
- Main window: Application’s opening window which displays the top menu bar, main display area, result display area and command input area.
- Mainstream OS: Windows, Linux, Unix, OS-X
- Patient records: Extensive collection of patients’ private information (not meant to be shared) and medical histories.
- Profile window: A pop-up window that displays the patient’s information and past visitations.
- Visitation: A completed consultation with the doctor.
- Visitation Log Window: A pop-up window that allows the user to fill in visitation details in a form.
Appendix F: Instructions for manual testing
Given below are instructions to test the app manually.
F.1 Launch and shutdown
-
Initial launch
-
Download the jar file and copy into an empty folder
-
Double-click the jar file Expected: Shows the GUI with a set of sample patient contact details. The window size may not be optimum.
-
-
Saving window preferences
-
Resize the window to an optimum size. Move the window to a different location. Close the window.
-
Re-launch the app by double-clicking the jar file.
Expected: The most recent window size and location is retained.
-
F.2 Adding a patient
-
Adding a new patient to the patient list
-
Test case:
add n/John Doe p/12345678 ic/s1234567a
Expected: A patient named John Doe should be added to the patient list with the provided phone number and NRIC. -
Test case:
add n/John Doe
Expected: No patient is added. Error message will be shown as phone number and NRIC are missing. -
Test case:
add n/John Doe p/12345678 ic/s1234567a s/male
Expected: No patient is added. Error message will be shown as an invalid sex is given. -
Other incorrect commands to try:
add 1,addExpected: No patient is added. Error message will be shown as an invalid command is given.
-
F.3 Editing a patient
-
Editing the details of a patient
-
Prerequisites: There is at least more than one patient in the patient list.
-
Test case:
edit 1 g/sulfa g/aspirin
Expected: The existing allergy tags (if applicable) of the 1st patient are replaced with new allergy tags,sulfaandaspirin. -
Test case:
edit 1 p/1234567890
Expected: No patient is edited. Error message will be shown as invalid phone number is provided. -
Test case:
edit 0 n/John Doe
Expected: No patient is edited. Error message will be shown as an invalid index is provided. -
Other incorrect commands to try:
edit,edit x,...(where x is larger than the list size)
Expected: Similar to previous.
-
F.4 Deleting a patient
-
Deleting a patient while all patients are being shown
-
Prerequisites: List all patients using the
listcommand. Multiple patients in the list. -
Test case:
delete 1
Expected: 1st patient is deleted from the list. Details of the deleted patient shown in the status message. Timestamp in the status bar is updated. -
Test case:
delete 0
Expected: No patient is deleted. Error details shown in the status message. Status bar remains the same. -
Other incorrect commands to try:
delete,delete x,...(where x is larger than the list size)
Expected: Similar to previous.
-
F.5 Displaying patient’s profile
-
Displaying patient’s profile window
-
Prerequisites: List all patients using the list command. Multiple patients in the list.
-
Test case:
profile 2
Expected: A separate window that displays details of the 2nd patient will appear. Relevant patient records, as well as past visitation logs will be shown. -
Test case:
profile -1
Expected: Error message will be shown as an invalid patient index is given. -
Other incorrect commands to try:
profile 0,profile one,profile 90000(assuming 90000 is larger than size of patient list)
Expected: Error message will be shown as an invalid command is given.
-
F.6 Adding profile picture
-
Adding profile picture to patient’s profile
-
Prerequisites: List all patients using the list command. Multiple patients in the list.
-
Test case:
addpicture 1 f/downloads/profile_picture.png
Expected: Patient’s profile picture will be updated with the desired profile picture. -
Test case:
addpicture 0 f/downloads/profile_picture.png
Expected: Error message will be shown as invalid patient index is given. -
Test case:
addpicture 1 f/downloads/profile_picture
Expected: Error message will be shown as invalid filepath is given. -
Other incorrect commands to try:
addpicture -1 f/downloads/profile_picture,addpicture 1 f/downloads/profile_picture.gif
Expected: Error message will be shown as an invalid command is given.
-
F.7 Adding visitation log
-
Adding new visitation log for a patient
-
Prerequisites: List all patients using the list command. Multiple patients in the list.
-
Test case:
addvisit 1
Expected: A separate window displaying the three fields (Diagnosis, Prescription, Comments) required for a visitation log will appear. After inputting the relevant details, saving the visitation log will result in a success message being shown in the main window. -
Test case:
addvisit 1 vd/31/07/2020
Expected: Similar to previous scenario. -
Test case:
addvisit 1 vd/35/12/2020
Expected: Error message will be shown as an invalid date is given. -
Other incorrect commands to try:
addvisit 1 vd/test,addvisit 90000 vd/test(assuming 90000 is larger than size of patient list)
Expected: Error message will be shown as an invalid command is given.
-
F.8 Editing visitation log
-
Editing existing visitation log for a patient
-
Prerequisites: List all patients using the list command. Patients, each with visitation logs, are in the list.
-
Test case:
editvisit 1 i/2
Expected: 1st patient’s 2nd visitation log will be available to edit. A separate window displaying the three fields (Diagnosis, Prescription, Comments) with existing visitation log details filled, will appear. After editing the relevant details, saving the visitation log will result in a success message being shown in the main window. -
Test case:
editvisit 1 i/2 vd/31/07/2020
Expected: Similar to previous scenario, and the visitation date will be changed to 31/07/2020. -
Test case:
editvisit 1 vd/15/01/2050
Expected: Error message will be shown as a future date is given. (Only past dates up till and including today will be accepted) -
Test case:
editvisit 1 vd/30/13/2020
Expected: Error message will be shown as an invalid date is given. -
Other incorrect commands to try:
editvisit -99,editvisit 1 vd/test,editvisit 1 vd/99
Expected: Error message will be shown as an invalid parameter is given.
-
F.9 Deleting visitation log
-
Deleting a visitation log for a patient.
-
Prerequisites: List all patients using the list command. Patients, each with visitation logs, are in the list.
-
Test case:
deletevisit 1 i/2
Expected: Deletes the 2nd visitation log of the 1st patient in the patient list. A success message will be shown in the main window. -
Test case:
deletevisit 1
Expected: Error message will be shown as no visitation log index is given. -
Test case:
deletevisit i/3
Expected: Error message will be shown as no patient log index is given. -
Other incorrect commands to try:
deletevisit 1 i/test,deletevisit test i/3
Expected: Error message will be shown as an invalid parameter is given.
-
F.10 Adding an appointment
-
Adding a new appointment to the appointment list and calendar
-
Test case:
addappt 1 st/11/11/2020 12:00 d/60
Expected: An appointment containing the details of the 1st patient, appointment date, starting and ending time will be added to the appointment list and reflected in the calendar. -
Test case:
addappt
Expected: No appointment is added. Error details shown in the status message. Status bar remains the same. -
Other incorrect add appointment commands to try:
addappt x st/11/11/2020 12:00 d/60(where x is larger than the list size),addappt 0 st/11/11/2020 12:00 d/60,addappt 0 st/42/42/2020 25:00 d/2147483647
Expected: Similar to previous.
-
F.11 Editing an appointment
-
Editing the details of an appointment
-
Test case:
editappt 1 d/30
Expected: The duration of the 1st appointment is edited to 30 minutes and the change is updated in the appointment list and calendar. Details of the edited appointment is shown in the result display box. -
Test case:
editappt 0
Expected: No appointment is edited. Error details are shown in the result display area. -
Test case:
editappt 1 d/0
Expected: No appointment is edited. Error details are shown in the result display area. -
Other incorrect delete commands to try:
editappt,editappt x,...(where x is larger than the list size)
Expected: Similar to previous.
-
F.12 Deleting an appointment
-
Deleting an appointment in the appointment list and calendar
-
Test case:
deleteappt 1
Expected: 1st appointment is deleted from the list and removed from calendar. Details of the deleted appointment shown in the status message. Timestamp in the status bar is updated. -
Test case:
deleteappt 0
Expected: No appointment is deleted. Error details shown in the status message. Status bar remains the same. -
Other incorrect delete commands to try:
deleteappt,deleteappt x,...(where x is larger than the list size)
Expected: Similar to previous.
-
F.13 Saving data
-
Dealing with missing/corrupted data files
-
Prerequisites: The json file saved contains data for at least one patient.
-
Test case: Corrupted json file
Open updata/clinical.jsonin a text editor and change any field to an invalid value. For example, try including an alphabet in the phone number of a patient.
Expected: The application should start gracefully with an empty set of data, without crashing. The application will log an error to the console.
-
Appendix G: Effort
All members of the team contributed equally to the project and the development guide. For specifics, check out the portfolio pages of the team members, found on About Us.